|
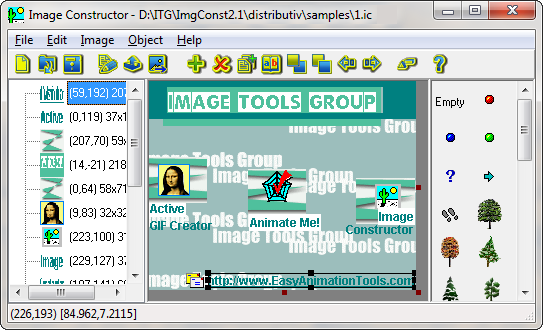
How to view demo examples?
To view demo examples select menu item File. It contains list of recently used ic- files (up to 9). Version 2.0 also supports projects with old extension .img. You can select any of these files by click of the left mouse button. During work with the program this list is changing. To view demo examples you can also select menu item File / Open or click the toolbar button  and select any file from the folder samples with the help of standard Windows dialog box. and select any file from the folder samples with the help of standard Windows dialog box.
Getting started.
At first you can set working parameters. Dialog File / Preferences defines view of the main window and initial parameters for new image and inserted objects.
Page New defines size of new image and parameters of its background.
You can select background style: Color, Gradient or Picture.
- To have colored background you should click the radiobutton Color and select wanted color with the button Color.
- To set background with gradient fill press the radiobutton Gradient and any radiobutton in the group Gradient style. Select colors of a gradient with the help of colored panels From color and To color.
- It is also possible to use any picture from BMP, JPEG, GIF, WMF, EMF, PNG, ICO, PCX, PSD- file as a background. For this purpose press the radiobutton Picture, the button Browse and select wanted picture from standard Windows dialog. You can also select picture placing style with the help of radiobuttons in the group Picture style.
To create new image select menu item File / New or click the toolbar button  . .
Later you can change attributes of the current image (size, background and coordinates) with the help of menu item Image / Properties or the toolbar button  . It is more convenient to change image size with the help of markers placed around image- just drag them by the mouse. . It is more convenient to change image size with the help of markers placed around image- just drag them by the mouse.
Note: default coordinates for new project have range from 0 to 100.
What objects you can add to the image?
Select menu item Object / Add or click the toolbar button  . Appeared dialog Object(s) attributes helps you to select new object for the image: . Appeared dialog Object(s) attributes helps you to select new object for the image:
- from a set of basic objects in the right part of this dialog (you can also add basic object directly from main window);
- from BMP, JPEG, GIF, WMF, EMF, ICO, PCX, PNG and PSD- files by pressing the button Browse;
- from clipboard by pressing the button
 ; ;
- you can form an object as a text line image. For this purpose press the button
 and set parameters of the text in the dialog Text image; and set parameters of the text in the dialog Text image;
- you can form an object as a coordinate axis image. For this purpose press the button
 and set parameters of the coordinate axis in the dialog Axis image. and set parameters of the coordinate axis in the dialog Axis image.
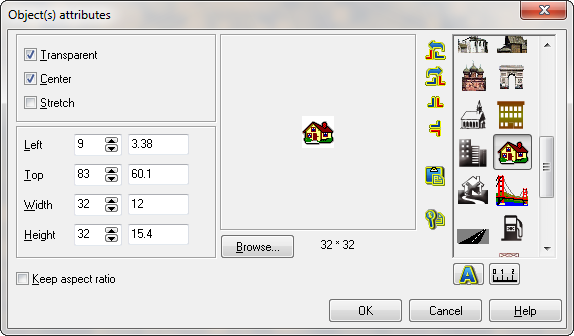
Irrespective of a method of object choice, you can set attributes of the selected object with the help of checkboxes and spinedits in the left part of this dialog. Finally press the button OK and wanted object will be pasted in the left top corner of image. It is marked by the rectangle with 8 markers on a perimeter. Thus you can add necessary number of objects.
Note: initial attributes for new objects (Transparent, Center, Stretch) are defined in preferences dialog on page New.
Set of basic objects.
Panel with a set of basic objects is placed in the right part of the main window. Set of basic objects is a bitmap strip of pictures with sizes 32x32. You can use sets enclosed to Image Constructor or your own created with the help any image editor (for example, Active GIF Creator). Set of basic objects is selected in the dialog File / Preferences (page View). For this purpose uncheck flag Default, press the button Browse and select file with wanted image set from the standard Windows dialog. Object Empty always goes first in a set of basic objects, meaning absence of selected object for pasting. To add an object to image select it by the left mouse button, then click by the left mouse button in the desired place of the image. If you select a basic object with a pressed button Shift, this object will be selected for a multi-times paste. It means: when you place the object to image, the button with this object remains selected and you can continue to paste this object to image. To stop multi- times paste select object Empty or any other basic object.
Image collections.
You can want to use objects from different sets of basic objects. Image Constructor has such tool in menu item File / Image collections. Multiple image sets will be displayed as separate windows with image collections. You can move and resize these windows. If you click on some image in a window with image collection it will be pasted to editing picture in the left top corner.
Later you can drag image from image collection directly to the desired place on the picture. Press left mouse button on it and move mouse pointer with pressed button to desired place, then release the button.
In dialog Image collections you can add, delete and sort items in list of bitmap strips. You can also make any image set visible or invisible with the help of checkboxes.
How to select objects located on the image?
There are some ways:
- press left mouse button on wanted object directly on an image. The object will be marked by a rectangle with markers (black frame);
- select an item from the list of objects, located in the left part in the main window;
- use menu items Object / Previous (Next) or click the toolbar buttons
 ( ( ); );
- if you want to select one of overlapped objects put mouse pointer in the necessary place and search wanted object with the help of hot keys CTRL+TAB;
- if you want to select all objects located on the image use menu item Edit / Select All. The first object from the list of objects will be marked by a red frame, others by grey frames;
- if you want to select group of objects use the left mouse button with the pressed SHIFT key. The first object in this group of objects will be marked by a red frame, others by grey frames. If you select some object that already included to the group, it will be removed from the group.
Note: you can make some operations with selected objects only.
How to edit object attributes?
Select menu item Object / Edit or click the toolbar button  . The same result gives double click by the left mouse button on an object placed on an image. Also you can select item from the list of objects in the left part of the program window. . The same result gives double click by the left mouse button on an object placed on an image. Also you can select item from the list of objects in the left part of the program window.
In the appeared dialog Object(s) attributes you can:
- change position of the object on image with the help of spinedits Left and Top. The object (group of objects) marked by frame is more convenient to move directly on an image with the pressed left mouse button;
- change sizes of the object with the help of spinedits Width and Height or directly on image with the help of markers, moving them by the mouse;
- set background of object to be transparent or not (flag Transparent is applyed for BMP- objects only) and a way how the object changes its sizes (flags Center and Stretch);
- rotate object left and right 90 degrees, flip horizontally and vertically;
- if some group of objects is selected, the attributes of the first selected object are displayed in this window; the value of any modified attribute will be assigned to all objects in the group (attributes that have the icon
 will be changed, and with the icon will be changed, and with the icon will not be changed). The iconunder object image means that this image is an attribute. Rotations and flips suppose that we assign this image to all objects in the group. will not be changed). The iconunder object image means that this image is an attribute. Rotations and flips suppose that we assign this image to all objects in the group.
What else can you do with selected objects?
You can:
- delete object (group of objects) with the help of menu item Object / Delete or the toolbar button
 ; ;
- create copies of objects with the help of menu item Object / Duplicate or the toolbar button
 ; ;
- bring selected object to foreground (send it to background) among all other objects with the help of menu item Object / Bring to front (Send to back) or the toolbar buttons
 ( ( ); );
- cut object (group of objects) to clipboard with the help of menu item Edit / Cut;
- copy object (group of object) from a current image to clipboard with the help of menu item Edit / Copy;
- paste object (group of objects) from clipboard to a current image with the help of menu item Edit / Paste ;
- align group of objects on the picture with the help of menu item Edit / Alignment Palette and opening dialog Alignment. The single object marked by a red frame (selected with the pressed key SHIFT) you can align horizontally and vertically on background picture.
What can you do with created illustration?
You can:
- scale image with all objects with the help of menu item Image / Scale or directly in the main window by mouse using markers and pressed key CTRL;
- copy current image with all objects to clipboard in BMP- format with the help of menu item Image / Copy to clipboard or the toolbar button
 . .
Note: during rescaling coordinate values are not changed in spite of changes in image width and height (in pixels) on computer screen.
How to save created image?
You can save created image as IMG- file. For this purpose select menu item File / Save or the toolbar button  . You can save your image in file with with different name or to another folder by selecting menu item File / Save as. . You can save your image in file with with different name or to another folder by selecting menu item File / Save as.
You can export created image to BMP, JPEG, GIF- files with the help of menu item File / Export or the toolbar button  . .
Localization.
Image Constructor supports internationalization. Program interface may be seen in one of human languages. It includes menus, screen messages, all texts used in interface. To change language use menu item Help / Language. Select a language and press OK.
Examples of illustrations.
|